

| David McMinn |
| Vital Information |
I am a 24 year old student, done a BEng in Computer Engineering,
currently studying for a PhD in evolutionary artificial
intelligence, at The Robert Gordon University, Aberdeen,
Scotland. Likes football, drinking, computers, drinking and not
to forget football!
| Not so Vital Information |
I first got into computers back when the Acorn Electron came out, and have been trying to resist technology since then. I bought a second hand Spectrum in 1990 and then an Amiga 500+ in 1992 and then a second hand A1200 in 1994. More recently I got a PC in 1996 (for Uni stuff) but now I have a lovely, lovely, lovely 68060 in my A1200 (Tower). I've been into programming since I got the Electron and have always had ambitions to code the greatest game of all time (G-GOAT, hey that would be a good game :), but I don't have the patience. I'm more into programming utilities on the Amiga, stuff for uni on the PC and mostly anything (Motorola) microcontroller based. I'm experienced in Blitz2 (Amiga only), C/C++ and Assembly (68k and 68xx only).
| Films |
| Music |
| Reading |
| Contact Information |
| Davids Main Amiga Specs |
| Click Thumbnails for larger Picture |


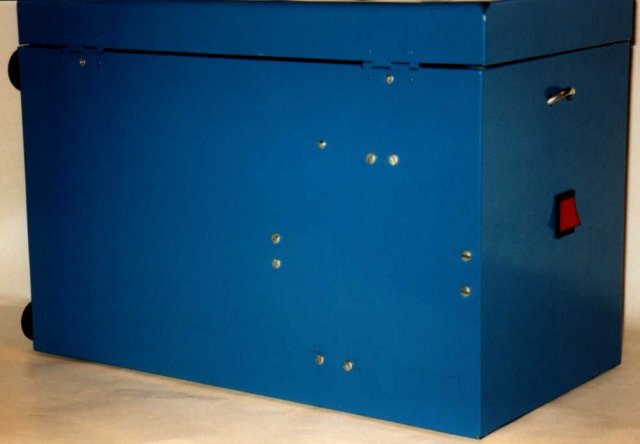


Over the last couple of weeks (12th Feb 2002 to 26th Feb) my Amiga has been dead. So I took the opportunity to revamp the case to make it a bit more "luggable" :) (luggable meaning portable, but still heavy enough to be a hassle). Some pics of the case are shown above, so you can click on them to get a bigger view. Thankfully I managed to finish the case and get the Amiga working in time for the Alt-WoA 2002 show, where it was on display on the Scalos stand.
The case was bought from Argos and is actually a filing cabinet type thing for storing folders and paper. It cost around �10 and I think it is for A4 sized paper (might have been foolscap? I just grabbed it off the shelf though :). Other parts were aluminium bars, rods and L-shaped brackets bought from B&Q and assorted screws, washers, nuts, etc. Maplins was also quite useful - I got the power switch and a set of needle files from there (and the needle files were damned handy when my dodgy hole- drilling skills were a bit more off-centre than normal :).
The motherboard (bought for �20 from Amibench), Mediator and Blizzard1260 (SIMM held in using a couple of ty-wraps :) are mounted in a metal frame. The ports at the back stick through and are secured to one aluminium bar, and the motherboard holes at the front are mounted on a L-shaped bar. A couple of other L- shaped bars form sliding runners under the motherboard. The PCI cards in the Mediator are supported by some more bars sticking up from port edge support.
The motherboard then fits onto the inside of the case by sliding the runners underneath a couple of aluminium bars. It is held in place using a simple spring-based quick release latch. Also attached to the case is the HDD bracket (again with a spring locking latch). The HDD slides into the bracket just beside where the case lid is held open with another bar. On the bottom of the case there are four heavy duty rubber cabinet feet (mmmm, table surface friendly - nice ;). The final case items are two handles suitable for attaching a shoulder strap - these were made out of two U-shaped rods, normally used for securing pipes and things to walls.
The PSU is held in using "Fixit Blocks" (or at least that is what is says on the bag ;). Basically, two self tapping screws (per block) go through the case and into the plastic blocks. A nut is then hammered into the block at the side where it meets the tower case and a rod is put through it. There are four such block/rod combinations, and then bars were placed between them to secure the PSU against the case and between the blocks. There is a red neon rocker switch on the top of the case to turn it on and off.
As you can see, there is no CD drive or floppy in there - those will be the next additions, and it will fill up the rest of all that nasty empty space ;)
The A4000 keyboard is connected to the motherboard using the well- known keyboard hack. However, at the recent Alt-WoA 2002 show I purchased an EZKEY-XS Mk2 keyboard adaptor from Eyetech, but have still got to fit it - here's hoping it works even with the keyboard hack in the way or I'll need to go buy another motherboard ;)
The VGA monitor is used thanks to the scandoubler/flickerfixer and Voodoo3. Previously, I used a fiddled DBLNTSC monitor preferences and a VGA monitor adapter.
Also, the boot delay hack has been used so that I don't need to manually reset my Amiga after turning it on, although this has not been required since I got the 13Gb drive and EIDE adapter.
The Zip drive works great and is connected via the ppazip adapter. Some of my WB screenshots are shown. As mentioned above, I use Scalos as a WorkBench replacement. Other stuff I used in the WB screenshots are the recent additions of VisualPrefs (using the RMTronics gadget set and some of my own settings) and Birdie2000 (the active borders are the 001.jpg from that archive passed through a red filter, and the inactive borders are a grayscale version of the same file). The main backdrop is from The Scumm Bar (a Monkey Island tribute site). Window backdrops are the TissueDark and MarbleDark from the standard MUI distribution. The third grab shows the Scalos "About" window. The final grab shows some progs running (Prayer2 - MP3 player, Frogger - MPG player and Multiview showing a flying saucer pic).
| Second Amiga (Currently on loan for the rest of the Season |
The reason this Amiga came about was due to the number of spare
parts I had lying around. The motherboard used to be in my main
Amiga, but after it blew up (literally, sparks and everything -
could have something to do with 5V and 0V coming into contact :)
I got the other motherboard. However, I managed to fix it: the
only thing wrong was that the 5V line at the PSU connector on the
motherboard had burst, so a little solder later... However, I've since swapped that 1D4 for a 1A because no floppy
drives in existance seemed to work on it (must've killed a CIA or
something). They do now appear to work OK with the 1A. Due to the trashed metal shield, the mouse port was inaccessable.
So thats why there is a joystick/mouse switcher connected to the
mouse port (internally!). All the other bits in this Amiga are
leftovers from various upgrades to the main Amiga. I also run WinUAE (with a variety of configurations) on my
Duron750/128Mb/Voodoo3 when I don't have access to my Amigas or
have to get a fix of that nostalgia gaming :)
