
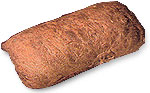
This rustic Italian bread is unique. The dough is so wet that you don’t even shape the loaf—just scrape it onto the baking pan into any interesting shape. The resulting loaf is flat and irregular; Ciabatta in Italian means “old slipper”. The extra moisture in the dough creates an open, unusual crumb. The bread is baked in a steamy environment, which creates a wonderful chewy crust. We hope you enjoy this authentic Italian bread.
Note: Each step in the mixing of this bread is simple and straightforward but to develop the texture, the dough must rise three times. Please allow up to three hours for rising.
Ingredients
For the sponge:
2 2/3 cups warm water (about 105 degrees)
1 7-gram yeast packet
2/3 cup olive oil
4 cups bread flour
1 teaspoon dough conditioner
2 cups bread flour
1 tablespoon salt
1 tablespoon flour (for dusting)
cornmeal to dust the pan
Directions
1. Place about 1/3 cup of the warm water in the mixing bowl of your stand type mixer, add the yeast, and stir to dissolve. Add the remaining warm water, the oil (at room temperature), the four cups of bread flour, and the dough conditioner. Using your stand-type mixer and dough hook, mix for five minutes or until the dough is smooth and elastic.
2. Remove the dough hook, cover with plastic wrap, and let stand until doubled—about one hour. (Since this dough is very sticky, grease the plastic wrap if it will come in contact with the dough.)
3. Using your dough hook, stir down the risen dough and add the remaining two cups of bread flour and salt. Continue mixing for about four minutes or until the dough again becomes smooth. The dough will still be more moist and stickier than the dough for most breads. Remove the dough hook, cover, and let stand until doubled—about 45 minutes.
4. Lightly grease a sheet pan and sprinkle it generously with cornmeal.
5. Using a sharp knife, divide the dough in the bowl into halves and gently scrape each half onto the floured pan to form two rough-hewn loaves. To protect its structure and texture, do not shape or handle the dough. Using the remaining tablespoon of flour and a sifter or strainer, evenly dust the tops of the loaves.
6. Lightly cover the bread with plastic and set it aside to rise again. When the loaf is nearly doubled in size, when it is still firm enough to hold its shape, and when cracks appear in the dusted flour the bread is ready for baking. The last rising should take about 45 minutes, depending on temperature and altitude.
7. To create crusty loaves, you will need steam in the oven. Place a large flat metal pan on the bottom rack of the oven to be used to hold water and with which to create steam and condition the crust. (Since high heat may distort the pan, the pan should not be expensive—an old baking sheet is perfect.) Preheat the oven to 500 degrees.
8. Immediately before placing the bread in the oven, mist the sides of the oven with water using a spray mister and then pour two cups of hot water into the steam pan. Be very careful—steam can burn badly. To avoid rising steam, pour the water in without holding your hand directly over the pan. Wear an oven mitt and turn your face away from the escaping steam both when you pour the water into the hot pan and later when you open the oven.
9. Immediately place the loaves in the hot oven and quickly close the door to retain the steam. Turn the temperature down to 425 degrees and bake for fifteen minutes opening the oven after five minutes to mist the walls again. After the bread has baked for fifteen minutes, reduce the heat to 375 degrees. Continue baking for another 20 to 30 minutes or until the crust is golden brown and the bread tests done. The interior of the bread should reach 200 degrees. The bread must be hotter than most breads to drive the moisture from the loaf. A moist bread will not hold a crust well. (Since different ovens hold their heat differently, you may need to adjust your baking time.) Cool completely on racks before slicing.
![]()
| © RIYAN Productions |