

  A Simple 100Hz To 10KHz Square Wave Generator.
  ---------------------------------------------
		Barry Walker
Specifications, (A1200(HD)):-
-----------------------------
1) Waveforms Generated ............ Square Wave Only.
2) Designed Frequency Range ....... 100Hz to 10KHz.
3) Usable Frequency Range ......... 10Hz to 30KHz.
4) Frequency Accuracy ............. Better than + or - 2%.
5) Rise And Fall Time(s) .......... Better that 10uS.
6) Mark To Space .................. 1 to 1.
7) Output Voltage ................. Better than 0.5V peak to peak.
8) Output Impedance ............... Approximately 3 KilOhms.
9) Hum And Noise .................. Better than 30dB below fundamental
signal at maximum output.
10) Computer Audio Channel Used .... Left hand channel ONLY.
11) All Classic AMIGA Compatible ... Yes, including WinUAE, (AF2005).
12) Minimum AMIGA OS ............... OS1.3x.
13) Mouse Required ................. No, only the keyboard is used.
14) GPL ............................ Yes, source included and compiled
under ACE Basic Compiler, (C)D.Benn.
15) Hardware Required .............. A simple home made connecting cable.
----------------------------------------------------------------------------
Overview:-
----------
This project is a simple square wave generator only and can be used for
basic audio checks. It is a single output only using the left audio
channel of the AMIGA. It is just a simple audio source to check whether
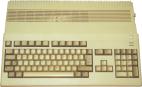
an audio amplifier is working or not. This works on ANY classic AMIGA
AND WinUAE, (Amiga Forever 2005), with FULL sound emulation.
----------------------------------------------------------------------------
Keyboard Controls:-
-------------------
1) ~Q~, ~q~, ~Space Bar~ or ~Esc~ .... Quit the program.
2) ~i~ increase frequency ............ 500Hz steps.
3) ~I~ increase frequency ............ 10Hz steps.
4) ~o~ increase frequency ............ 1Hz steps(ish :).
5) ~d~ decrease frequency ............ 500Hz steps.
6) ~D~ decrease frequency ............ 10Hz steps.
7) ~O~ decrease frequency ............ 1Hz steps(ish :).
8) ~v~ increase output level ......... 0-100%.
9) ~V~ decrease output level ......... 100-0%.
10) ~m~ instant maximum output ........ 100%.
11) ~M~ instant output off ............ 0%.
12) ~f~ audio filter off .............. Normal.
13) ~F~ audio filter on ............... Not much use.
(Note:- On some installations of WinUAE/AF?? the 'Esc' key can give
problems. It was added purely for completeness.)
Default conditions:-
--------------------
1) Frequency ......................... 1000Hz.
2) Output level ...................... 100%, maximum.
3) Audio filter ...................... Off.
With modification to the software and recompiling it is possible
to extend the frequency range from 1Hz to 50(+)KHz...
You will notice that the screen grab
 only shows some of these keyboard controls.
These are the only important ones for general testing, the others were
added for completeness.
----------------------------------------------------------------------------
Construction Of The Test Lead
------------------------------
Parts Required:-
----------------
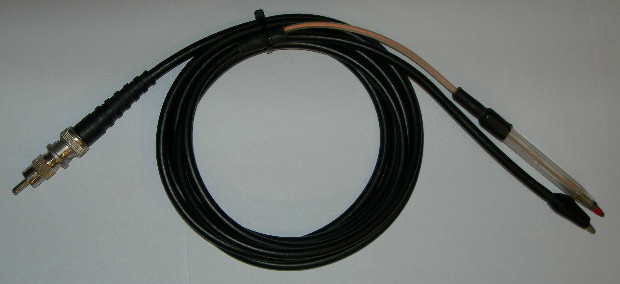
1) A length of coaxial cable approximately 1.5 metres, RG58 or UR76.
2) Two PHONO or RCA plugs. One will be left blank.
3) A countersunk head brass screw approximately 1.5" (37mm) long.
4) A matching nut.
5) An insulated crocodile clip.
6) A length of sleeving, (the sleeving off of the coaxial cable will do).
7) An old ballpoint pen case.
----------------------------------------------------------------------------
Tools Required:-
----------------
1) Soldering iron.
2) Solder. (NOTE:- Solder with lead in it is now banned in the UK.)
3) Side cutters.
4) Pliers.
5) File.
6) A hobby saw.
7) PVC tape.
8) Superglue, (be very careful with this).
----------------------------------------------------------------------------
Strip at least 6" to 9" of sleeving off of one end of the coaxial cable.
Do NOT discard this sleeving. Seperate the braid from the inner conductor.
Solder the inner conductor to the head of the brass countersunk-head screw.
Place the sleeving over the braiding before fitting the crocodile clip
and then wrap some PVC tape around the ~Y~ joint of the cable. Solder
the crocodile clip to the braiding.
Dismantle an old ballpoint pen to obtain the case. Discard all of the
inner parts of the pen.
Before reassembling the screw into the ballpoint pen case, cut the case
down to a practical length, (approximately 3" to 4").
Fit the PHONO, (RCA), plug to the other end of the coaxial cable, inner
conductor to the pin, the braid to the outer part of the plug.
View the pictures for additional information.
only shows some of these keyboard controls.
These are the only important ones for general testing, the others were
added for completeness.
----------------------------------------------------------------------------
Construction Of The Test Lead
------------------------------
Parts Required:-
----------------
1) A length of coaxial cable approximately 1.5 metres, RG58 or UR76.
2) Two PHONO or RCA plugs. One will be left blank.
3) A countersunk head brass screw approximately 1.5" (37mm) long.
4) A matching nut.
5) An insulated crocodile clip.
6) A length of sleeving, (the sleeving off of the coaxial cable will do).
7) An old ballpoint pen case.
----------------------------------------------------------------------------
Tools Required:-
----------------
1) Soldering iron.
2) Solder. (NOTE:- Solder with lead in it is now banned in the UK.)
3) Side cutters.
4) Pliers.
5) File.
6) A hobby saw.
7) PVC tape.
8) Superglue, (be very careful with this).
----------------------------------------------------------------------------
Strip at least 6" to 9" of sleeving off of one end of the coaxial cable.
Do NOT discard this sleeving. Seperate the braid from the inner conductor.
Solder the inner conductor to the head of the brass countersunk-head screw.
Place the sleeving over the braiding before fitting the crocodile clip
and then wrap some PVC tape around the ~Y~ joint of the cable. Solder
the crocodile clip to the braiding.
Dismantle an old ballpoint pen to obtain the case. Discard all of the
inner parts of the pen.
Before reassembling the screw into the ballpoint pen case, cut the case
down to a practical length, (approximately 3" to 4").
Fit the PHONO, (RCA), plug to the other end of the coaxial cable, inner
conductor to the pin, the braid to the outer part of the plug.
View the pictures for additional information.
 When you have checked this cable and are confident it is electrically good
use the superglue to seal the top of the pen case and the nut. Do NOT get
this glue on you or anything else as it is dangerous. Allow time to dry.
----------------------------------------------------------------------------
Starting The Square Wave Generator:-
------------------------------------
*** WARNING ***
DO NOT USE WITH VOLTAGES GREATER THAN 12 VOLTS D.C.
1) Ensure the AMIGA is switched OFF.
2) Connect the cable to LEFT channel phono socket.
3) Connect a blank PHONO/RCA plug to the RIGHT channel phono socket.
4) Switch on the AMIGA and boot into Workbench.
5) Open up a Shell/CLI.
6) Go to the ~VOLUME:Drawer~ with the ~Square_Wave_Gen~ software inside.
7) Type "Square_Wave_Gen[RETURN]" without the quotes and away we go.
8) Connect up to an audio circuit and start testing.
9) When finished switch OFF the AMIGA and disconnect all of the hardware.
----------------------------------------------------------------------------
The ACE Basic Compiler Code:-
-----------------------------
When you have checked this cable and are confident it is electrically good
use the superglue to seal the top of the pen case and the nut. Do NOT get
this glue on you or anything else as it is dangerous. Allow time to dry.
----------------------------------------------------------------------------
Starting The Square Wave Generator:-
------------------------------------
*** WARNING ***
DO NOT USE WITH VOLTAGES GREATER THAN 12 VOLTS D.C.
1) Ensure the AMIGA is switched OFF.
2) Connect the cable to LEFT channel phono socket.
3) Connect a blank PHONO/RCA plug to the RIGHT channel phono socket.
4) Switch on the AMIGA and boot into Workbench.
5) Open up a Shell/CLI.
6) Go to the ~VOLUME:Drawer~ with the ~Square_Wave_Gen~ software inside.
7) Type "Square_Wave_Gen[RETURN]" without the quotes and away we go.
8) Connect up to an audio circuit and start testing.
9) When finished switch OFF the AMIGA and disconnect all of the hardware.
----------------------------------------------------------------------------
The ACE Basic Compiler Code:-
-----------------------------
REM A simple Square Wave Generator.
REM This is ready for ACE Basic Compiler, (C)David Benn.
REM Given to    http://www.thecryptmag.com/    and as PD for all.
REM This will work from OS1.3x to 3.xx without modification.
REM It will also work under WinUAE with full sound enabled.

REM Set up a WorkBench window and fix the font to ~topaz 8~.
  WINDOW 1," A WIDE BAND SQUARE WAVE GENERATOR, (C)1996-2006, B.WALKER, G0LCU.",(0,0)-(640,200),6
  FONT "topaz.font",8
  COLOR 1,0
  CLS

REM Set up variabes.
  LET a$="$VER: Square_Wave_Generator-Version_0.76.64_(C)12-05-1996_G0LCU."
  LET addr&=ALLOC(512,0)
  LET toneaddr&=addr&
  LET pokeaddr&=addr&
  LET dataaddr&=pokeaddr&
  LET n=0
  LET freq=1000
  LET period=INT(3563220/(6*freq))
  LET volume=64

  FOR n=0 TO 201
  LET dataaddr&=(pokeaddr&+n)
  POKE dataaddr&,127
  NEXT n

  POKE (pokeaddr&+1),-128

  FOR n=6 TO 9
  LET dataaddr&=(pokeaddr&+n)
  POKE dataaddr&,-128
  NEXT n

  FOR n=26 TO 41
  LET dataaddr&=(pokeaddr&+n)
  POKE dataaddr&,-128
  NEXT n

  FOR n=106 TO 169
  LET dataaddr&=(pokeaddr&+n)
  POKE dataaddr&,-128
  NEXT n


REM Set up the screen.
screen_setup:
  LOCATE 3,24
  PRINT "SIGNAL OUTPUT LEFT AUDIO CHANNEL."
  LOCATE 6,25
  PRINT "Press the letter in brackets:-"
  LOCATE 7,25
  PRINT "------------------------------"
  LOCATE 9,21
  PRINT "(i) Increase frequency (coarse, 500Hz)."
  LOCATE 10,21
  PRINT "(I) Increase frequency (fine, 10Hz)."
  LOCATE 11,21
  PRINT "(d) Decrease frequency (coarse, 500Hz)."
  LOCATE 12,21
  PRINT "(D) Decrease frequency (fine, 10Hz)."
  LOCATE 13,21
  PRINT "(Q) or (q) Quit the program."
  LOCATE 16,31
  PRINT "FREQUENCY"
  LOCATE 19,6
  PRINT "Designed range 100Hz to 10KHz SQUARE WAVE. Useful range 10Hz to 30KHz."


REM Generate an audio tone.
  POKEW 14676118,15		'Switch off audio dma.
  POKEL 14676128,toneaddr&	'Set address to chip ram.
  POKEW 14676132,4		'Number of words in data sample.
  POKEW 14676134,period		'Period of sampling time.
  POKEW 14676136,volume		'Volume max 64, min 0.
  POKEW 14676126,255		'Disable any other modulation.
  POKEW 14676118,33281		'Enable sound on CH1.
  POKE 12574721,254		'Disable audio filter.


REM This is the program loop.
key_hold:
  LET a$=INKEY$
  IF a$="q" OR a$="Q" OR a$=" " OR a$=CHR$(27) THEN GOTO cleanup:
  IF a$="i" THEN LET freq=freq+500
  IF a$="I" THEN LET freq=freq+10
  IF a$="d" THEN LET freq=freq-500
  IF a$="D" THEN LET freq=freq-10
  IF a$="o" THEN LET freq=freq+1
  IF a$="O" THEN LET freq=freq-1
  If a$="v" THEN LET volume=volume+1
  IF a$="V" THEN LET volume=Volume-1
  IF a$="m" THEN LET volume=64
  IF a$="M" THEN LET volume=0
  IF a$="f" THEN POKE 12574721,254
  IF a$="F" THEN POKE 12574721,252
  IF freq<=10 THEN LET freq=10
  IF freq>=30000 THEN LET freq=30000
  IF volume<=0 THEN LET volume=0
  IF volume>=64 THEN LET volume=64
  LOCATE 16,40
  PRINT freq;"Hz.";"        "
  IF freq>3520 THEN GOTO band0:
  IF freq>880 THEN GOTO band1:
  IF freq>220 THEN GOTO band2:
  GOTO band3:
  GOTO key_hold:
band0:
  LET period=INT(3563220/(2*freq))
  POKEL 14676128,toneaddr&
  POKEW 14676132,1
  POKEW 14676134,period
  POKEW 14676136,volume
  GOTO key_hold:
band1:
  LET period=INT(3563220/(8*freq))
  POKEL 14676128,(toneaddr&+2)
  POKEW 14676132,4
  POKEW 14676134,period
  POKEW 14676136,volume
  GOTO key_hold:
band2:
  LET period=INT(3563220/(32*freq))
  POKEL 14676128,(toneaddr&+10)
  POKEW 14676132,16
  POKEW 14676134,period
  POKEW 14676136,volume
  GOTO key_hold:
band3:
  LET period=INT(3563220/(128*freq))
  POKEL 14676128,(toneaddr&+42)
  POKEW 14676132,64
  POKEW 14676134,period
  POKEW 14676136,volume
  GOTO key_hold:


REM This is the cleanup routine.
cleanup:
  POKEW 14676118,15		'Turn off audio DMA.
  POKE 12574721,252		'Enable audio filter.
  CLEAR ALLOC			'Reclaim memory.
  WINDOW CLOSE 1		'Close the window.
  END				'Exit without errorcode.

----------------------------------------------------------------------------
  Note that although this is compiled BASIC, (using ACE Basic Compiler),
  with a little time and effort this code could be modified to suit
  AmigaBASIC easily and use the AmigaBASIC interpreter.

  As it stands the executable WILL run on OS1.3x successfully as well as
  OS2.0x and above. NO special libraries, handlers, devices or commands are
  required, ONLY a full, standard OS install. The project sticks rigidly
  to my CRITERIA described in the Magazine's Issue 44.


Square_Wave_Gen.lha - The Main Executable

  Last but not least, the FULL archive of this project including the source
  code and HAM images also can be found at:-

 http://main.aminet.net/hard/hack/AMIGA-Project2.lha

============================================================================

     IMPORTANT:-
 -----------


    The Legal Stuff:-
    -----------------

    These programs are Freeware and no profit will be made from them,
    also all of the files must remain unaltered and intact including this
    one. The author is not responsible for any damage to, or loss of, or
    failure of equipment or data caused in any way by the use of these
    programs. There is NO warranty with the use of these software releases
    and YOU USE THEM AT YOUR OWN RISK.

----------------------------------------------------------------------------

    Testing Evaluation:-
    --------------------

    An A1200(HD) in 2MB, 6MB and 10MB modes using trapdoor memory AND/OR
    PCMCIA memory expansions. Also tested on an A600(HD) in 2MB and 6MB
    modes. All test conditions were/are running STANDARD KS2.0x to 3.1x,
    and using standard ~topaz 8~ fonts throughout.

    I have no idea what a strange configuration setup will create so refer
    to the ~The Legal Stuff~ above.

----------------------------------------------------------------------------

  WARNING.
 --------

  1) DISCONNECT any faulty equipment under test from the MAINS supply.
  2) If a DC supply is used do NOT reverse polarity the connections.
  3) Do NOT power up any electronic item until it is safe to do so.
  4) CHECK and RECHECK all of your construction and repair work thoroughly.
  5) Handle ALL tools used with care.
  6) Beware of ALL types of solvents, glues and etching fluids.
  7) NEVER leave a soldering iron switched on unattended.
  8) KEEP everything OUT of the reach of small children.
  9) Switch OFF the AMIGA before disconnecting or connecting any hardware.
 10) And finally read 1) to 9) again.

----------------------------------------------------------------------------

   Contact:-
   ---------

   Mr Barry Walker, G0LCU.

   Email:-     wisecracker@tesco.net
   URL:-       http://homepages.tesco.net/wisecracker/G0LCU.HTM

   Author of the ~TestGear?~ projects in the ~hard/hack~ drawer of AMINET.

----------------------------------------------------------------------------

   A very useful HardWare related site, (C) Anthony Hoffman, for
   modifications, schematics, repairs and the like is:-

    http://amiga.serveftp.net/

============================================================================
![]()
| © RIYAN Productions |